Below I have shared some of my best and person favourite tips and tricks for achieving the Perfect DIY Manicured Nails!!
Keep an eye out for the second portion of this post where I will be sharing even MORE Hacks and Cheats on how to create your own Professional Manicure from home for a fraction of the cost - including directions on how to make your own DIY Nail Stickers & so much more!
#1.
Start with a clean blank slate! It doesn't matter how perfectly you
apply your polish - If your nails aren't clean and bare you'll be
left with a mess! Always remove ALL excess nail polish left on the
nails. Wash your hands with soap and water, making sure to clean
under your nails, and if necessary buff the tops to get rid of any
deep ridges or splitting edges!
#2.
The 3 stripe rule for a professional finish.
I
found this picture that explains it much more poetically than I can.
#3.
I'm often asked how I get my manicures to last without chipping -
Diamond Strength No Chip Nail Colour in Clear! I absolutely swear by
this as my go to top coat!! You can even use it on top of your lower quality
polishes (I have a few that I just LOVED the colour but absolutely
hate the finish) and always end up with a perfect finish that will
LAST!
#4.
After applying your top coat the same way as you did your polish *as
explained above in #1* swipe across the tip/end of your nail! This
will seal your polish as well as making it much more resistant to
chips and peeling!
#5.
Instead of going out and buying all new matte finish polishes, Invest
in a good matte top coat and turn all of your favourite gloss
polishes into matte polishes! This also allows you to try different
looks & mix it up!
I recently got a matte top coat by Quo and I
will be sharing tutorials using this VERY soon!
#6.If
you have pale or dry hands you may find that they become stained
after you remove your polish! Fix this by applying a good hand cream
before the polish to protect and provide a barrier on your skin! My
absolute favourite is FC5 Ultra-Hydrating Hand Creme by Arbonne!!
#7.
How to remove nail polish, glitter, and shellac, easily with NO mess!
A
lot of you have asked about how I remove all of the glitter and
sparkles I use on my nails, or have said you love the look of glitter
but can't stand the mess of a removing it! I use acetone (This can
also be used to remove fake nails but that is a bit more extensive so
I will be posting a tutorial explaining this process in the near
future) which can be found at most if not ALL nail salons, as well as
Target & various other departments stores!
Step1.
Using a cotton ball soaked in acetone press down on your nail firmly
and hold for 10-30seconds do this one each nail allowing the acetone
to penetrate the layers!
Step
2. Using a fresh acetone soaked cotton ball go back, starting with
the nail you started with and wipe off the polish with ease!
#8.
Apply Natural Oil or VapoRub around the nail bed before painting your
nails for the absolute PERFECT manicure every time. I find this trick especially helpful for my right hand! This will allow
you to easily flake off any excess polish around the nail!
I Use Aromassentials Awaken or Unwind (I absolutely love essential oils, if you have never heard or tried them - I suggest you do)
#9.
The first few coats of glitter polish should be DABBED on! This will
give you MUCH more precision and control over where the
sparkles/glitter fall!!
#10.
Apply several thin coats of polish as apposed to one thick one! I
realize obviously this takes more time but it will be a more durable,
long-lasting finish!
#11.
Create the perfect Polka-Dots using the round end of a Bobby pin!
#12.
Make your own nail 'detailer' by attaching/shoving a pin into the
eraser at the end of a pencil to use when creating intricate designs!
#13.
I loved the initial idea... But I actually hate the FAST?QUICK drying
polishes. They almost seem to dry as I'm still applying them, and I'm
never happy with how they turn out! Instead, soak your nails in ICE
WATER to dry your nails perfectly without a smudge in just 3minutes!
#14.
Apply a coat of white polish under sheer/thin or bright/neon colours
to minimize the number of coats needed & really make the colour
pop!
#15.
Nail Polish Savior! Nail Thinner can be added to polishes that were
left open or starting to loose their luster! Just slowly add to the
bottle & shake as needed until you are happy with the
consistency!
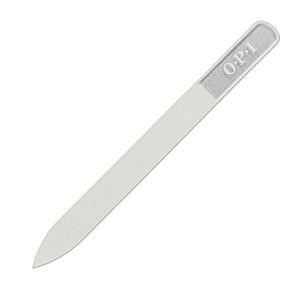
#16.
You may not think it makes a difference but what nail file you use
absolutely can make or BREAK your nails! I strongly
suggest ditching the disposable files for good and investing in a
glass or crystal nail file - they are easy to clean (rinse with water & let dry) and actually seal
the keratin layers on
the surface of the nail preventing splits, chips & breakage.
There
are quite a few tips and tricks to whiten your nails & remove
stains left behind after nail polish. A few of the ones I find most
effective:
#17.
Many people use tooth paste. The ingredient in it that is actually
doing the whitening is Baking Soda - So I suggest just using a small
amount of plain old-fashioned Baking Soda on a tooth brush for much
better results.
*You'll
also find much better results whitening your teeth with Baking Soda
over a "whitening toothpaste" as well*
#18.
You can also create a paste out of peroxide and baking soda for a
very effective stain remover for nails *Apply to nails and let sit
for 60seconds then scrub with a tooth brush.
#19.
Denture Cleaner! It really doesn't matter what kind you use - they
all contain various ingredients to effectively lift stains off of
hard white surfaces! Dissolve the cleaner in a bowl of warm water and
soak your nails!
#20.
You can also use lemon juice which has a natural bleaching agent!
simply
Dab onto nails and let sit for as long as desired to rinse away
stains!
Dream Big Sparkle More Shine Bright