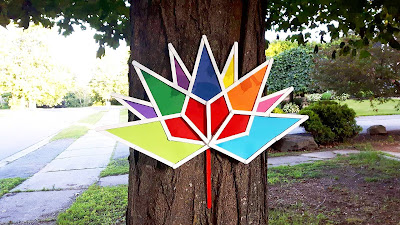
I started decorating earlier that usual with this DIY ‘Sweet As Maple Syrup”
Garland
( scroll down to the very bottom to see pictures of this as well)
( scroll down to the very bottom to see pictures of this as well)
Not being in Ottawa this year, where the decorations start going up before the
snow is all gone & the warm weather even rolls in… I decided to take
matters into my own hands (pun intended) & created an [Upcy] up-cycled
version of this Year’s 150th Canada Celebration Logo.
I didn’t plan on sharing this as a Tutorial when I originally made this, but
after sharing a snap I took while making it I received a LOT of feedback, and
requests for a tutorial, & decided to go ahead and share it for those of you who enjoyed
it & would like to make their own!
Supplies Needed:
~ Popsicle Sticks
~ Hot Glue Gun & Glue Sticks
~ White & Red Paint
~ Paint bush(s)
~ Red, Orange, Yellow, Pink, Sky Blue, Navy Blue, Violet, Purple, Lime Green, & Grass Green Cardstock
~ Small length of ribbon or rope.
~ Small length of ribbon or rope.
How To:
(constructing the basic Gemotic Shapes)
To construct your Geometric Maple Leaf you are going to make 5 large ‘Diamond’
shapes, 4 Small ‘V’ shapes, as well as the stem as shown above. I have broken
down how to make all of these key shapes into steps & step by step images
below. For this you are going to need Popsicle sticks & your glue gun.
Step #3. Using single popsicle sticks this time attaching one popsicle stick to the open ends of the V to continue the process of creating 5 Large Diamond shapes.
Step #4. Once those are secure in place move on lastly to gluing the ends of the single popsicle sticks together {closing the Diamond shape}
repeat this process 5 times, creating 5 Diamond Shapes, &
one double length popsicle stick left over which you will use later as the
Stem
Step #5. Create the small ‘V’ shapes by gluing the tips of two singular
popsicle sticks, with an opening of roughly 1.5”.(Assembly Required)
Using your Hot Glue Gun, & Refer to the Images directly above for Assembly
Instructions– I kind of get why Ikea uses Images over text as this is very
difficult to explain verbally
Step #6. Begin by laying down two large Diamond shapes as shown above, attach them with Hot Glue overlapping the two base Popsicle sticks. [Referring to Image 1 directly above]Step #7. Attach a third large Diamond shape in the center (as shown above) with the place of attachment for the first two being placed in the direct center! [Referring to Image 2 directly above]
Step #8. Attach the fourth large Diamond shape to either the left or right side ( I chose the right when referring to the images above) do this by overlapping again with the outer-edge of the center Diamond the same way you attached the first two) [Referring to Image 3 directly above]
Step # 9. Attach the fifth and last large Diamond shape to the apposing side to that chosen in Step #8. Repeating the same process. [Referring to Image 4 directly above]
Step #'s 10-13. Chose either the left or right side to begin (I chose the right when referring to the images above). Using your Hot Glue Gun
(Adding The Colour)


