Search This Blog

Monday, October 27, 2014

Owl - (Must try Make-Up Looks for This Halloween)

This is the fourth & final Halloween themed #MakeupMonday!! So far we have done The Queen Of HeartsBetty BoopA Cheetah & this week we will continue the Animal Trend with a classic Halloween face - The Owl! 
Owl Halloween Makeup
Modeled By: Kelsie Caughlan
Makeup By: Jennie Matthie

Products I Used: 


  • Arbonne CC Cream  
  • Concealer - Light
  • Eye-shadow in shade Ganache (a white with translucent sparkle undertone) - From the Sugar Plum Pallet. 
  • Eye-shadow in shade Marple (a deep brown tone) from the Victoria Lake Pallet.
  • Sheer Glow Highlighter
  • Bronzer
  • Bronze Highlighter
  • Rose Petal Lipstick 
  • It's A Long Story Mascara 
  • Candlelight Eye-shadow Pencil (GOLD). not pictured 

How To Get The Look!

Base:
Step 1. I began by applying Arbonne's new 10 IN 1 CC cream over the entire face (which has their world class Primer built right in) 
Step 2. I then applied concealer below her eyes in a V shape, over her entire eyelid (& any areas of concern to you that you wish to cover or reduce)  to create a nice clean light base to apply your Shadow/ future products.
Step 3. I contoured by applying Bronzer to the C shape, along the sides of my nose, chin and outer forehead, followed by the Bronze Highlighter in the same areas!
Step 4. I Then went ahead & Highlighter using Sheer Glow Highlighter below the brow bone, to the tear duct, & below the eyes (following a similar V shape in which you applies your Concealer), to the ridge of the nose, lips (cupids bow shape)  


Owl Halloween Makeup - Get The Look!
Modeled By: Kelsie Caughlan
Makeup By: Jennie Matthie
Face & Eyes:
Step 5. Using a large shadow brush I applied Ganache Eye Shadow over the entire eye lid, as well as extending/blending this shadow all the way down to the top of the cheek bone(s), & continuing up past the eyebrow about 2 Inches blending out around the eyes & nose as seen in the images above!
Step 6. Using the Candle Light eye shadow pencil in gentle stroke outwards creating a soft feathering affect around the eye(s) in a C-Shape, as well as down the center of the nose as shows in the image(s) above. 
Step 7. Boldly fill your brow - I used Maple to fill her's here & though I did it incredibly boldly, I find this colour - when applied with the right intention - is a pretty good standard colour to go to for anyone with dark hair/colouring.
Step 8. I again very quite BOLDLY drew a contouring line down the side(s) of the nose, between the eyes - blending them up and into the eye brows & feathering 
Step 9. Using your Candlelight eye shadow pencil draw a V shape on the tip of your nose to finish the beak shape! 
Step 10. Using an Angle Brush Apply the Maple eye shadow as eyeliner along the top lash line & using an angle brush lined the outer portion of the bottom lash line, softly blending it out into the bottom lashes! 
Step 11. Apply It's a Long Story Mascara to the bottom lashes
Step 12. Finish off the look by applying Feather(s) / Feather Eyelashes which can be found at just about any Halloween / Costume Store! (After this step is finished go over the lash band again with your eyeliner using the Maple E-shadow & angle brush (you can dampen it slightly to enhance the pigment of the shadow) to ensure it is completely covered! 


Lip/Snout:
Step 13. I went with a super simple natural lip - my favourite go to for a natural lip is always Rose Petal  (made by Arbonne), its the perfect pale pink that works perfectly on just about EVERY skin tone & the best part, it that it is a Lipstick, Lip Gloss & Lip Chap all in one pretty tube!!  
Owl Halloween Makeup
Modeled By: Kelsie Caughlan
Makeup By: Jennie Matthie
We had such a HOOT creating this look for Halloween!!
A HUGE Thank You goes out to my close friend, the stunning & creative Kelsie Caughlan! Your support, words of encouragement & copious amounts of inspiration & encouragement means the world the me!!
Happy Halloween Week!!

Dream Big  SparkleMore  ShineBright

Tuesday, October 21, 2014

Simple & Easy DIY Paint Projects to Update Your Decor for Halloween.

Halloween is one of my favouite Holidays to decorate for (of course nothing can top Christmas) It is the perfect time to think outside the box and experiment with different ideas! 
Though some people find paint to be one of the messier choices, Cody insists this is NOT the case, As unlike glitter it washes off of the walls and carpet... 

Though this can all be avoided if you lay down a sheet of plastic or a cut open plastic bag or some old paper though I prefer something plastic as there is no risk of the paint seeping through! 
It is a very cost effective way to re-use those old glass bottles (or various other house hold items) you have laying around and with just a quick coat of pain turn them into a creative decorations for Any occasion. I am going to share a few of the different Halloween Ideas I tried this year, as well as a few tried & true!

Simple & Easy DIY Paint Projects to Update Your Decor for Halloween. 

Devil & Angel Pillow Cases:

Using any Pillow Case of your choice (I recommend white OR a sold colour) begin by laying it flay out on your table and place a piece of card-stock a plastic bag inside to insure no colour seeps through the layers of fabric. I would suggest first gently drawing this out with a pencil so you can make any corrections needed. Then using a black Paint Pen (I am absolutely obsessed with these btw - they work so much better than a sharpie and has much more control than a paint brush!) trace over your picture and let sit for 5-10min to ensure it has dried completely! I went with a Devil & Angel Theme for mine, but the possibilities are endless so get creative with your designs!
My Go-To Paint Pen!

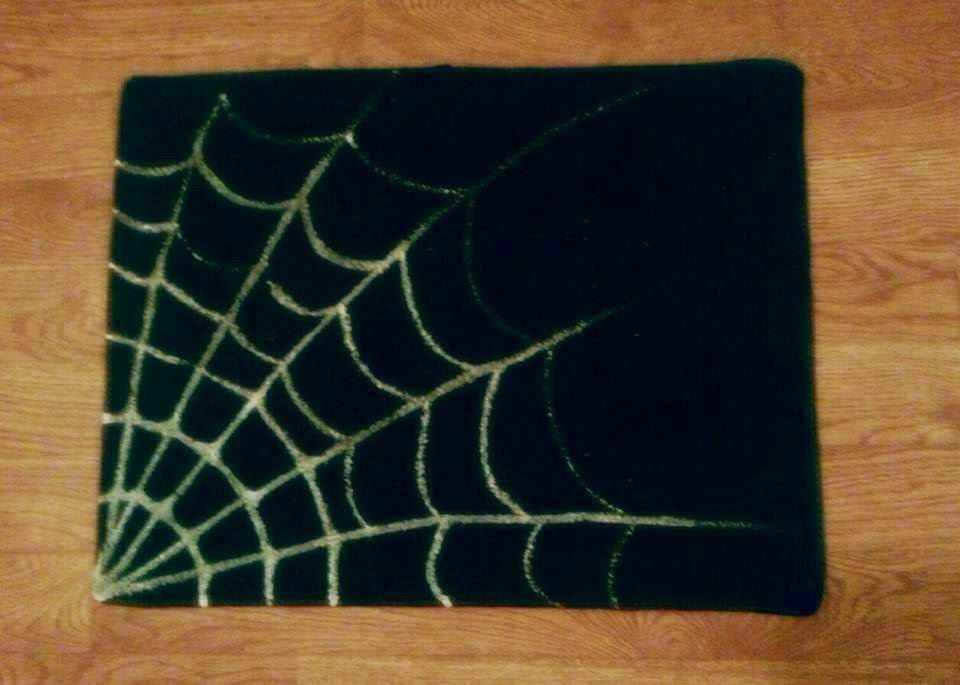
Cob-Web Carpet:

Using an old black foot mat we used to have in our front hallway I decided to attempt to re-create a cob-web carpet idea I had scene on Pinterest.
This project cost me a total of $0.00 since I already had the silver paint & the rug had certainly seen better days which just adds to it's CREEPY feel!

Using a Pencil or Fabric marker that is visible on black begin to draw your web design (optional)  you can find a TUN of free templates or pictures to go off of) for this online if you don't feel comfortable drawing it by hand. I did mine on a whim one night Free-Hand & it certainly is not without flaws - Spider webs are abstract in design so I encourage you to just go for it & paint on your cob-web design on using white or silver paint!

Witches Potion Station/ Monster Vase(s):

This is a super simple concept I have shared on the blog before & is one that works for absolutely ANY occasion! Start by removing all labels from your glass bottle/jar (if there is any glue left on the bottle this can be easily removed using rubbing alcohol) Then simply poor paint into the top of your bottle and rotate it as necessary to coat the entire inside of the bottle. Flip the bottle upside down & allow any excess paint to drain out.
I used my trusty Paint Pen to draw on the Frankenstein & Witch Faces, as well to create the Labels for the Witches Potion Station (which read: Potion, Brew, & a skull and cross bones).

What are some of your favourite ways to switch up old decor for the Holidays? 
Love to hear from you!!
& As always, Thank You for browsing & Remember to...
Dream Big      Sparkle More      Shine Bright

Sunday, October 19, 2014

Cheetah - (Must try Make-Up Looks to Try This Halloween).

For the entire month of October I will be sharing Halloween themed #MakeupMondays 
& this weeks look is Cheetah inspired.
I knew I wanted at least one animal inspired makeup tutorial and I am so glad to use a product line that isn't tested on one. In addition, you may be shocked to find out some of the animal by-products are used in cosmetic lines - including ALL higher end products sold in retail.
 All looks shared on my Blog are created using Arbonne's Cosmetics which are Vegan certified!! 
Cheetah Halloween Makeup
Modeled & Makeup By: Jennie Matthie

Products I Used: 

  • Arbonne CC Cream  
  • Concealer - Light
  • Bronzer
  • SheerGlow Highlighter
  • Bronze Highlighter
  • Runway Rouge Lipstick
  • Eye Shadow in shade Blackout
  • Black Liquid Eyeliner 
  • Sugar Plum Baked Eye Shadow Pallet 
  • It's A Long Story Mascara 

How To Get The Look!

Cheetah Halloween Makeup
Modeled & Makeup By: Jennie Matthie
Face:
Step 1. I began by applying Arbonne's new 10 IN 1 CC cream over my entire face! 
Step 2. I then applied concealer below my eyes in a V shape in shade slightly lighter than my natural colour to begin contouring. 
Step 3. Applied Bronzer to the C shape, along the sides of my nose, chin and outer forehead. 
Step 4. I then applied Sheer Glow Highlighter below the eyes where I highlighted using Concealer & Sheer Glow Bronzer where I applied my Bronzer to finish the contouring. 
Eye:
Step 5. Naturally fill in your Eyebrows - I like to use a shadow (Cabernet) as my brows are quite thick on their own & just need some light filling. 
Step: 6. I kept my eyes very neutral. I gently dabbed concealer over my entire lid just to give a nice even tone & cover any veins & smooth out any unsightly creases!  
Step 7. I then highlighted below the brow & tear duct using shade Icing from the Sugar Plum Pallet. 
Step 8. Applied Liquid eyeliner along the top lash line & dragging outwards (extending the lash-line) to create a dramatic wing! Feel free to go BIG with this, it is Halloween after all. 
Step 9. Apply It's a Long Story Mascara & False Eyelashes (optional) 
Cheetah Spots
Step 10. Using a small angled brush draw several small dot-ish(?) spots in a cluster(s) above your eye & anywhere else you'd like to have them using Black Out Eye Shadow ( the less perfect your dots the more natural and real an effect)
Step 11. Using your Liquid Eyeliner in Black outline the dots in a C-shape to add depth to your spots. 
Lip/Snout:
Step 10. Apply Runway Rouge Lipstick - I like to use a lip brush, I just find it allows for more control.
Step 11. Take your black liquid eyeliner again and line the your top lip. Extend this line upwards inside the split/ Cupids Bow of your lip, matching up with the tip of the nose. 
Add a few dots below the nose (as whisker holes) & you're OFF!
Cheetah Halloween Makeup
Modeled & Makeup By: Jennie Matthie
Dream Big     Sparkle More      Shine Bright

Wednesday, October 15, 2014

Halloween - Arachnophobia Nest Wreath

True to form, the very first Halloween Tutorial I am going to share with you 
is how to make your own Halloween Themed Wreath to dress up your Front Door 
OR use as a Party/Wall decor. 
I have A few more Halloween themed DIY Party Decorations & Wall Decor Ideas coming your way for the entire month of October, so keep your eyes peeled..
Arachnophobia Nest Wreath By: Upcy

What you'll need:

  • recycled newspapers/advertisements
  • scissors
  • tape (of any kind)
  • Black Feather Boa(s) (the number needed will depending on the size of your wreath - I used 3 to create the one shown here).
  • small decorative spiders (can be found at any Dollar or Craft store, or anywhere Halloween decorations are sold)
  • Any other decorations you choose to add, I added a small cluster of dark purple Flowers as well as added purple and black glitter detailing to the spiders. 
  • hot glue gun
  • glue-stick refills

How to Create your Arachnophobia Nest Wreath


Step 1. Building your basic heart shape
Using Recycled news papers/advertisements I create a long tube that I shaped/rounded securing with tape as I went along until I had a doughnut like shape I was happy with! 
DO NOT stress if this is not a perfect (or even close to perfect) shape just yet, as it will be covered with fabric.
If you would like to see a more detailed step by step break down of how I create the center of my wreaths feel free to do that on a previous Wreath Tutorial 
I shared which you can find HERE 

Step 2. Wrap with Black Feather Boas. 
As shows in the Images below, using a hot glue gun start by adhering the end of your boa at any point on your wreath. You will want to try and separate the feathers & find the small rope on the center and glue this down as it will be very difficult to properly attack the loose feathers to your recycled paper doughnut core.  
DIY Arachnophobia Nest Wreath By: Upcy
Step 3. Continue Adding Boas as necessary
Continue wrapping the boa around the doughnut core adhering it by the center rope as you feel necessary to secure it. When adding your second, third, or possibly forth boas be sure to tuck the end of the new boas under the previous one to ensure a seamless transition. 


Step 4. Add Spiders & Your choice of Decorative Details
Once your entire wreath is completely covered in feathers begin adding the spiders to your wreath in clusters, spread throughout, crawling up one side, however you'd like! 
Note: Before adding the spiders to my wreath I wanted to dress them up a bit so I added dark purple and black glitter to them using Mod Podge for my little touch of glitter - 
*be sure to allow them to dry completely before adding if you choose to do this as well

Step 5. & Your choice of Decorative Details
Don't be scared to get creative with it, & add any touches that you'd like, I decided to add a small cluster of Dark Plum/Purple Flowers to mine as you can see in the photos below, for a touch of colour & to really make the Purple glitter I used on the sliders POP!
Arachnophobia Nest Wreath By: Upcy
I hope you enjoyed this DIY & remember to ALWAYS
Dream Big     Sparkle More      Shine Bright

Monday, October 13, 2014

Betty Boop- (Must try Make-Up Looks to Try This Halloween).

For the month of October I will be sharing Halloween themed #MakeupMondays 
this weeks look is Betty Boop inspired.
Paired with tight pin curls, a red dress, red heals, & gold accessories 
this Makeup look would Make a very simple classic & cute Halloween Costume 
using just the items in your Closet & Makeup Bag
Betty Boop Halloween Makeup
Model: Carly Kimber
Makeup By: Jennie Matthie

Products I Used: 

I tried to keep the number of products to a minimum in the Halloween looks to Simplify & make them easier to re-create! 
  • Perfecting Liquid Foundation 
  • Concealer
  • Bronzer
  • SheerGlow Highlighter
  • Blush - Blossom 
  • Runway Rouge Lipstick
  • Black Liquid Eyeliner 
  • It's A Long Story Mascara 

Betty Boop Halloween Makeup
Model: Carly Kimber
Makeup By: Jennie Matthie

How To Get The Look!

Face: The cartoon character Betty Boop has a very oddly proportioned/elongated face. Using contouring & Re-Drawing eyebrows we can re-create her funny cartoon face shape!!
Step 1. Apply Primer followed by Perfecting Liquid Foundation over your entire face!
Step 2. We want to raise the eye brow - to about mid-way through your forehead in a very Up-turned shape! Begin covering your natural eye-brows - this will take several layers of this process. Begin by Applying Concealer over your eyebrows, (using whichever concealer matches your skin tone) then set this using a translucent setting powder. 
Repeat as necessary/desired - depending on the darkness & thickness of your brow this will be a bit easier/more challenging to achieve. 
* Note there are cosmetic products on the market designed to cover your eye brows, as well using a glue sticks applied over your brow to glue down the hairs is also effective.- But I like to keep my tutorials exclusively Arbonne Cosmetics.
Step 3. Apply concealer below the eyes down to mid-cheek this will be the beginning of the process of lowering her cheeks & then follow with sheer glow highligher in the same shape, as seen in the photo above.
Step 4. You will be applying your Bronzer slightly lower than you normally would to re-contour your cheek (think the top of your jaw bone as opposed to the natural contour)
Step 5. Finish off your newly shaped cheeks/face by applying blush in an obnoxiously round shape below your natural cheek bone in place of where you would traditionally contour!

Eye:
Step 6. Re-Draw your new BOLD BLACK Eye-brow using liquid eyeliner midway up your forehead in a very upturned fashion as shown in the image above of cartoon Betty Boop. 
Step: 7. Extend the natural - to create your new cartoon eye, using liquid eye liner, above and below your eye. as seen in the photo above *being sure to line your waterline as well. 
Step 8. Apply It's a long story Mascara to your lashes to blend them into the Black liner/your new eye shape.
Step 9. Apply False Eyelashes onto your eyelid to finish off your new eye shape. You can also draw on a few lash sweeps as I have done using your liquid eyeliner to really open up & enhance the eye!
Lip:
Step 10. Blend the outside portion of your lips out into your face using concealer and perfecting foundation!
Step 11. Re-draw your kissing/heart/duckface lips extending above and past your natural lip line using Runway rouge lipstick as seen above and below.
Betty Boop & The Queen Of Hearts
Model(s): Carly Kimber 
& Aly Dandach
Makeup By: Jennie Matthie

A Huge Thank You goes out to these beautiful, fun loving ladies 
for allowing me to share the photo's from their Halloween Transformations !!
Wishing you All a Happy Thanksgiving !!

Dream Big     Sparkle More      Shine Bright

Tuesday, October 7, 2014

Queen of Hearts - (Must try Make-Up Looks to Try This Halloween).

Halloween is the One Day of the year when absolutely EVERYONE, no matter the age, can dress up and as something or someone else - To get scared, and a little bit silly & really embrace our inner youth!! There is literally a NEVER ENDING list of costume ideas and themes that you could go as for Halloween, I have chosen a few of my favourite ideas on Cosmetic Halloween Costumes, and will share them with you over the month of October to illustrate how Cosmetics (on men,women,adults &,children) can take your costume to that Next Level!! 


The first Look I am going to show you is something a little different, 
& was inspired by The Queen of Hearts!
 (From A Card Deck, Not the Movie! Though that would certainly be a fun look to do as well!
Queen of Hearts Halloween Makeup
Model :Aly Dandach
Make-Up By: Jennie Matthie

How To Get The Look!

Products I Used: 

I tried to keep the number of products to a minimum in the Halloween looks to Simplify & make them easier to re-create! 

  • Perfecting Liquid Foundation 
  • Bronzer
  • Eye Shadow in shade Peace (A white with slight gold under-tone)
  • Runway Rouge Lipstick
  • Black Liquid Eyeliner 
  • It's A Long Story Mascara 
  • Eye-Shadow Pencil in shade Candle Light ( Metallic GOLD)


    Queen of Hearts Halloween Makeup
    Model :Aly Dandach
    Make-Up By: Jennie Matthie

    Pulling this look together is actually VERY simple to achieve in 10 easy steps!
Face: 
Step 1. Apply one shade of Perfecting Liquid Foundation over your inter face!
Step 2. Using the Eye-Shadow Pencil Draw a Heart around your entire face! 
Step 3. Colour in the ENTIRE heart-shape with Peace(white) Eye shadow. 
Step 4. Apply Bronzer to wear you would normally contour your face - Stopping at the gold line. 
Step 5. Using your black liquid eye liner draw a small heart on your cheek/face kind-of like a vintage beauty mark. 

Eye:
Step 6. BOLD your Eyebrow- using either your liquid eyeliner, regular black eyeliner, or even a black eye shadow - whatever you use you just want to insure it covers your natural brow extremely well! 
Step: 7. I used the Bronzer in place of Eye-shadow in this look to bring the warmth back to her face a bit, by sweeping it across her entire eye lid!
Step 8. Apply A traditional Winged Eyeliner using your liquid liner!
 this product gets used a LOT in this tutorial!
Step 9. Apply Two or Three coats or It's a Long Story Mascara (allowing a few seconds of dry time between coats)
OPTIONAL. Apply False Eye-lashes

Lip:
Step 10. Apply Runway Rouge Lipstick & you're on your way!!

Queen of Hearts & Betty Boop - A Sneak at next weeks look!
I hope that you are all getting into the Halloween Spirit as much as I am & Remember, You don't need a huge elaborate or expensive costume to get into the Spirit of Halloween, you can achieve so many different looks using what is already in your makeup bag!! 
Have a beautiful Tuesday, Thank You for Browsing & Remember to ALWAYS...
Dream Big     Sparkle More      Shine Bright

Wednesday, October 1, 2014

Halloween Decorations, Costume & Party Preparations!

Halloween Decorations & Party Preparations - Upcy
With today being the first of October I decided to share a little Halloween decoration prep, Party planning and inspiration! This is one of my absolute favourite months of the year, my Birthday, Thanksgiving & Halloween, Lots of time spent with Family & Friends, Amazing FRESH Food, & certainly no shortage of sweet treats, what's not to love!?
For most people is seems to feel like the beginning of the years end, for me  it always gives me that feeling of turning the page, a Fresh Starts! & has me itching to take on.start something new!
I can remember when I was little, As SOON as the Costumes started to make their way into Stores, my brothers & I would be at my Mom to drag out the MASSIVE Tickle-Trunk like Box filled with various costumes & funny old clothes collected & saved from years prior (despite this collection I remember my mom taking us out every year to get a new costume or in my case as a child, switch out anything that needed from my almost steady streak as a Princess!!) We or at-least I would spend pretty much every day after school dressing up in various costumes, Halloween wasn't just a one night thing for us!!
Though my love for anything old and tattered is fairly obvious I tend to navigate towards the more natural or even bright colours paired with a LOT of neutrals in my Day to Day life, in almost all aspects from Home Decor to Makeup & Fashion, but I do have an almost secret obsession with Dark/Gothic so I pretty much jump on the opportunity at this little window of time when extreme Creepiness' is socially acceptable! 

As you can see/read I plan on DIYing ALL of my decorations, I have shared a few of the different textures I plan to use (though I don't want to give away my intentions with them just yet). Lots of cob & spider webs.  Black on Black EVERYTHING with little touches of orange & white thrown in & of course a tun of Chocolate & homemade treats!!!
Though I wouldn't say I have my theme completely finalized, - which is fine because I still have weeks worth of Horror Movies & Halloween Specials ahead of me to help spark my creativity & imagination; Below I have shared my mini Inspiration Board so far.  I am so excited to share the DIY Decorations, & Halloween Makeup tutorials & ideas I have been working on with you guys this month!! 


I'll close this post with a beautiful picture, Welcoming Fall - shot by the lovely and talented Julia owner of Julia Patrick Photography that features a custom Tassel Garland by yours truly that you can find listed on the UpcyShop.
Julia Patrick Photography
Get Out & take advantage of the beautiful Fall weather we have been having while it's here & Remember to...

Dream Big Sparkle More Shine Bright