Search This Blog

Sunday, November 30, 2014

DIY Popsicle Stick Snowflake(s)

This is one that I had actually done last year & had quite a few requests for instructions.
 It really is quite easy & self explanatory by just looking at the image(s), & as simple as they are to make, they do a fantastic job transforming any stark white/ bare wall & creates quite a statement & in my experience a great conversation piece! 


Supplies:

  • Popsicle / Craft sticks. 
  • Paint & Paint Brush / Spray Paint 
  • Hot Glue Gun / Re-fill sticks. 
  • Ribbon 

How To:


Begin by choosing the shape you want to create - Snowflakes are unique by design so get creative with it!
Due to the fact that I made these last year, I am lacking pictures to say the least & If you prefer to follow a template you can find a slew of varying difficulty HERE


I began all of mine with the same 6 - Popsicle-stick center (as shown in the image below) & then just switched up the outer design(s) on each one! 
Once you have finished creating your designs paint them any colour you would like!
I did mine using a paint brush & acrylic paint - but this was very tedious, time consuming, 
& took quite a few coats & would recommend spray painting them instead!


After allowing to dry completely - Tie a piece of ribbon to the top & Voila Holiday Statement Wall!

You could also suspend them in a window using fishing wire in place of the ribbon! 


Thank you for browsing, & Happy Sunday!

I have lots more Christmas Themed tutorials & a few recipes coming throughout the month of December!


Dream Big      Sparkle More      Shine Bright

Wednesday, November 26, 2014

DIY Advent Calender

I can't believe it almost DECEMBER!

Is it just me or does November feel like it just flew by?
I have been building my inspiration board on Pinterest since early Summer 

& with that short lived flurry of snow I was inspired to get cracking 
on a few of the DIY Projects I plan to do this year which is almost over & I feel also FLEW by! 
Here is my take on the DIY Branch Advent Calender!

 I love this idea because it really opens up a whole new world of options of what can be found inside! 
You can use homemade treats (which is a great idea for anyone with diet restrictions),
little toys, or even a Holiday activity a Day! The Options are endless! 
It can also be made quite inexpensively too, depending on where you shop/what items you already have!
Alright Lets Get Cracking as December is only a few days a way!!

Supplies:


  • Branch ( Go for a walk & find a stick you like! )
  • Rope ( Red Christmas Cord from Ikea)
  • Small Envelopes ( I actually got mine from a sweet lady at my Bank, but you can find these at Staples or Michaels )
  • Paint & Paint Brush ( can be found at an Dollar Store for $1.00 )
  • Pine Cones / Spruce Leaves ? Berry Branches / Whatever you can imagine! (The branches were left over From a Wreath I had made - tutorials on that coming soon as well, & The pine cones where just ones I found & had painted gold last year for a Center Piece.) 
  • Washi Tape / masking tape / whatever you have on hand!


How To:

Begin by painting your numbers onto the front of each envelope. 
I did mine freehand but you could always use a stencil for this! 


Once dry, tape envelopes to the rope however you chose to display them.
 I did mine at different levels. 

Begin decorating the top of your Branch however you envisioned & be sure to tie a length of rope from one end of the Branch to the other - creating the loop to hang it by! 
You can also add little embellishments to your envelopes to give a little extra flair! 

Lastly tie the lengths of rope to your Branch, however you see fit! 
I recommend laying it out on the floor. 

Lastly Choose a spot in your home to display & enjoy all December long!

Last year was my first time making an Advent Calender but I have a feeling this will become a new Christmas Tradition in our house!  What are some of you and your families old traditions, or new ones you plan to start?
Dream Big             Sparkle More             Shine Bright

Tuesday, November 25, 2014

Sparkle Reindeer Silhouette Canvas

1 MONTH UNTIL CHRISTMAS!! 
The countdown starts now! I have been wildly busy these past few weeks & have quite a few posts - some shamefully from as far back as summer that I hope to get up sooner than later. In the mean time / In honor of the 1 Month mark - I decided to share a quick, simple & inexpensive but still super cute Holiday canvas tutorial to create a dramatic, eye catching piece to dress up a festive mantle or use as a wall hanging to warm up a bare wall.


I have provided the stencil I used in the Tutorial below - Simply click on the image to view & print OR Pin it to your Pinterest & save for a later date!

Supplies: 

  • Raindeer Stencil 
  • Canvas
  • Glitter
  • Clear Drying Craft Glue 
  • Paintbrush
  • Scissors 
  • Masking Tape 

How To: 

Step #1. Begin by printing out your stencil Attached Below, as a negative. 

Step #2.  Cut out the stencil as a negative as shown below.

 Step #3. Tape the stencil to your Canvas. 

Step #4. Using a paint brush apply glue from the outside of the stencil in ONLY to avoid any seepage issues.  


Step #5. Shake on your loose glitter - leave to sit for a few minutes and then shake of any excess glitter & carefully remove stencil & allow time to dry completely. 
 I absolutely LOVE all things that sparkle & glitter - SHOCKER - I know
& Christmas is the perfect time of year to bring that sparkle into your home decor!
I hope you have been enjoying this mild weather as much as I have & remember to always 
Dream Big Sparkle More Shine Bright

Wednesday, November 12, 2014

DIY Paint Pen Mugs


I know I am not the only one who has been loving this 'Sharpie' Mug Idea & for the past few years I have seen tutorials on Pinterest / various other blogs exclaiming its simplicity - just draw on a mug with a sharpie and voila - well that was until I started reading all the FAIL comments and complaints - that the drawings would wash off with just soap & water, and certainly would not withstand a dishwasher (who the heck wants to put that much effort into a mug they can't even use or wash? Not this gal)! 

 After seeing crowds of adorable Script mugs & tea sets on display - only to be stunned by their inflated price I decided that I would take another stab at this Sharpie Mug idea & came to the discovery that it MUST be an OIL BASED paint - Not water biased or you will end up with white mugs again after washing! You can use Oil Biased Sharpie Paint Markers (but an original sharpie will not do the trick). My Go To is actually the 'Painters'  Glass Paint Pens - They come in a TUN of colours including awesome metallic tones, & I love the pump tip, & find it gives a LOT of control when writing or drawing - Another awesome thing about these paint pens, is that before your mugs are baked you can actually touch up / remove the paint if you wish using just a bit of water & a rag or Q-tip! How Amazing is that -  No more silly mess-ups right near the end, that make you want to just chuck the mug across the room Or is that just me!!
Now Let me just say that while I have read that these will survive the dishwasher, I didn't attempt it myself, so try at your own risk, though I can attest that they WILL stand up to being washed in the sink with soap, hot water & a sponge! 


Supplies:


  • White ceramic mugs 
  • Painters Glass Paint Pen(s) / OIL BASED Sharpie Paint Markers
  • Pencil (optional) 
  • Tape (optional)
  • Oven & Baking Sheet

How To:


  Before you start give your mugs a quick wash & dry thoroughly to ensure that you are applying the paint to a nice, clean surface!   

Step 1. (optional) Using a pencil you can faintly draw on the design as a template/ to insure proper spacing! I did this on the His & Hers Mugs, (an Idea that was inspired by a tea set I saw We Heart It (Ya I'm still into that website - don't judge me) & thought it was perfect for Movember) 
OR
Apply Tape - another option/ idea to help create designs. 

This is a great DIY gift idea, perfect for a Holiday gift exchange/secret santa gift,& one you can personalize for just about anyone on your shopping list! -  The options are endless, I made some Christmas themed mugs as Gift Toppers with classic Holiday Movie Quotes & Christmas cookie dish. Not pictured.
Step 2. Draw on your design using your Paint Pen! - Remember that if you use the 'Painters' Paint Pen small adjustments can be made using water & a rag/Q-tip. 
(BE SURE TO DRY COMPLETELY AFTER YOU DO THIS OR YOU WILL BE LEFT WITH A STREAKY MESS)

Step 3. Add Any Accent Colour(s), if necessary.

Step 4. Place your mugs / dishes on a Baking sheet & Bake at 350 degrees for 20 minutes & then let sit to cool completely - (this will also take about 20-30 min)

Voila - Your Finished Products Revealed!

I decided to experiment a little bit & try an abstract geometric design using the Gold & I think that may have ended up being my favourite one out of them all!
Another Example Of what you can create; Tea Set I made for the tea loving newlyweds Houston & Aaron Mabo
- Photo Credit to Aaron Mabo.
 

Enjoy & Happy Movember!!
I will be sharing a tun of DIY gift & decoration Tutorials, & Recipes as the Holidays get closer & closer. If there is anything specific you would like to see, let me know; Your feedback is always appreciated!! & I'd love to hear what are some of your favourite ways to prepare & Celebrate?!  & Remember to Always...
 Dream Big     Sparkle More      Shine Bright

Monday, October 27, 2014

Owl - (Must try Make-Up Looks for This Halloween)

This is the fourth & final Halloween themed #MakeupMonday!! So far we have done The Queen Of HeartsBetty BoopA Cheetah & this week we will continue the Animal Trend with a classic Halloween face - The Owl! 
Owl Halloween Makeup
Modeled By: Kelsie Caughlan
Makeup By: Jennie Matthie

Products I Used: 


  • Arbonne CC Cream  
  • Concealer - Light
  • Eye-shadow in shade Ganache (a white with translucent sparkle undertone) - From the Sugar Plum Pallet. 
  • Eye-shadow in shade Marple (a deep brown tone) from the Victoria Lake Pallet.
  • Sheer Glow Highlighter
  • Bronzer
  • Bronze Highlighter
  • Rose Petal Lipstick 
  • It's A Long Story Mascara 
  • Candlelight Eye-shadow Pencil (GOLD). not pictured 

How To Get The Look!

Base:
Step 1. I began by applying Arbonne's new 10 IN 1 CC cream over the entire face (which has their world class Primer built right in) 
Step 2. I then applied concealer below her eyes in a V shape, over her entire eyelid (& any areas of concern to you that you wish to cover or reduce)  to create a nice clean light base to apply your Shadow/ future products.
Step 3. I contoured by applying Bronzer to the C shape, along the sides of my nose, chin and outer forehead, followed by the Bronze Highlighter in the same areas!
Step 4. I Then went ahead & Highlighter using Sheer Glow Highlighter below the brow bone, to the tear duct, & below the eyes (following a similar V shape in which you applies your Concealer), to the ridge of the nose, lips (cupids bow shape)  


Owl Halloween Makeup - Get The Look!
Modeled By: Kelsie Caughlan
Makeup By: Jennie Matthie
Face & Eyes:
Step 5. Using a large shadow brush I applied Ganache Eye Shadow over the entire eye lid, as well as extending/blending this shadow all the way down to the top of the cheek bone(s), & continuing up past the eyebrow about 2 Inches blending out around the eyes & nose as seen in the images above!
Step 6. Using the Candle Light eye shadow pencil in gentle stroke outwards creating a soft feathering affect around the eye(s) in a C-Shape, as well as down the center of the nose as shows in the image(s) above. 
Step 7. Boldly fill your brow - I used Maple to fill her's here & though I did it incredibly boldly, I find this colour - when applied with the right intention - is a pretty good standard colour to go to for anyone with dark hair/colouring.
Step 8. I again very quite BOLDLY drew a contouring line down the side(s) of the nose, between the eyes - blending them up and into the eye brows & feathering 
Step 9. Using your Candlelight eye shadow pencil draw a V shape on the tip of your nose to finish the beak shape! 
Step 10. Using an Angle Brush Apply the Maple eye shadow as eyeliner along the top lash line & using an angle brush lined the outer portion of the bottom lash line, softly blending it out into the bottom lashes! 
Step 11. Apply It's a Long Story Mascara to the bottom lashes
Step 12. Finish off the look by applying Feather(s) / Feather Eyelashes which can be found at just about any Halloween / Costume Store! (After this step is finished go over the lash band again with your eyeliner using the Maple E-shadow & angle brush (you can dampen it slightly to enhance the pigment of the shadow) to ensure it is completely covered! 


Lip/Snout:
Step 13. I went with a super simple natural lip - my favourite go to for a natural lip is always Rose Petal  (made by Arbonne), its the perfect pale pink that works perfectly on just about EVERY skin tone & the best part, it that it is a Lipstick, Lip Gloss & Lip Chap all in one pretty tube!!  
Owl Halloween Makeup
Modeled By: Kelsie Caughlan
Makeup By: Jennie Matthie
We had such a HOOT creating this look for Halloween!!
A HUGE Thank You goes out to my close friend, the stunning & creative Kelsie Caughlan! Your support, words of encouragement & copious amounts of inspiration & encouragement means the world the me!!
Happy Halloween Week!!

Dream Big  SparkleMore  ShineBright

Tuesday, October 21, 2014

Simple & Easy DIY Paint Projects to Update Your Decor for Halloween.

Halloween is one of my favouite Holidays to decorate for (of course nothing can top Christmas) It is the perfect time to think outside the box and experiment with different ideas! 
Though some people find paint to be one of the messier choices, Cody insists this is NOT the case, As unlike glitter it washes off of the walls and carpet... 

Though this can all be avoided if you lay down a sheet of plastic or a cut open plastic bag or some old paper though I prefer something plastic as there is no risk of the paint seeping through! 
It is a very cost effective way to re-use those old glass bottles (or various other house hold items) you have laying around and with just a quick coat of pain turn them into a creative decorations for Any occasion. I am going to share a few of the different Halloween Ideas I tried this year, as well as a few tried & true!

Simple & Easy DIY Paint Projects to Update Your Decor for Halloween. 

Devil & Angel Pillow Cases:

Using any Pillow Case of your choice (I recommend white OR a sold colour) begin by laying it flay out on your table and place a piece of card-stock a plastic bag inside to insure no colour seeps through the layers of fabric. I would suggest first gently drawing this out with a pencil so you can make any corrections needed. Then using a black Paint Pen (I am absolutely obsessed with these btw - they work so much better than a sharpie and has much more control than a paint brush!) trace over your picture and let sit for 5-10min to ensure it has dried completely! I went with a Devil & Angel Theme for mine, but the possibilities are endless so get creative with your designs!
My Go-To Paint Pen!

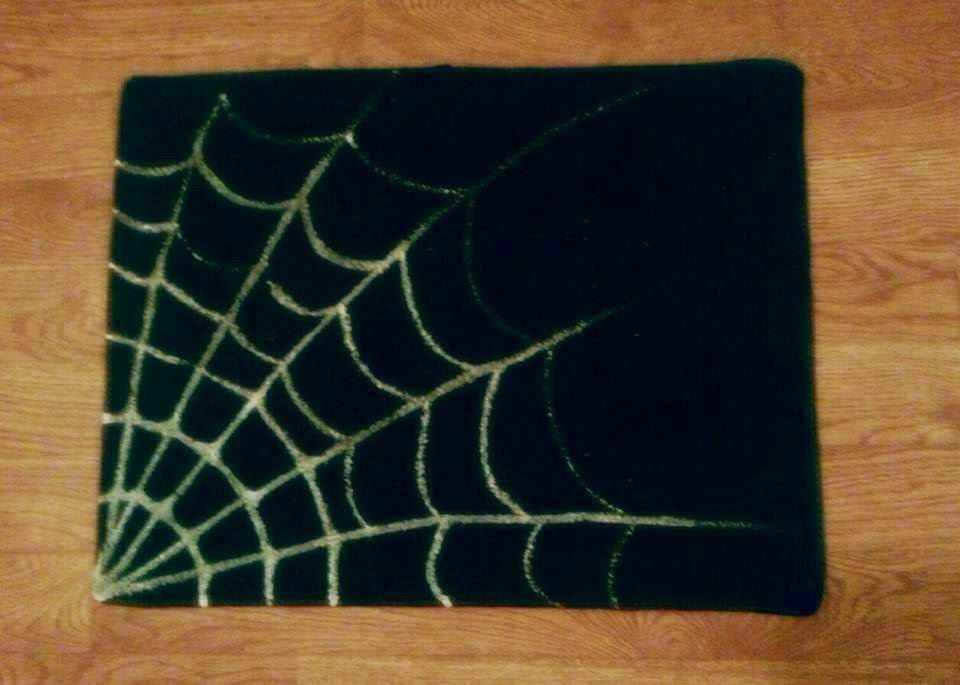
Cob-Web Carpet:

Using an old black foot mat we used to have in our front hallway I decided to attempt to re-create a cob-web carpet idea I had scene on Pinterest.
This project cost me a total of $0.00 since I already had the silver paint & the rug had certainly seen better days which just adds to it's CREEPY feel!

Using a Pencil or Fabric marker that is visible on black begin to draw your web design (optional)  you can find a TUN of free templates or pictures to go off of) for this online if you don't feel comfortable drawing it by hand. I did mine on a whim one night Free-Hand & it certainly is not without flaws - Spider webs are abstract in design so I encourage you to just go for it & paint on your cob-web design on using white or silver paint!

Witches Potion Station/ Monster Vase(s):

This is a super simple concept I have shared on the blog before & is one that works for absolutely ANY occasion! Start by removing all labels from your glass bottle/jar (if there is any glue left on the bottle this can be easily removed using rubbing alcohol) Then simply poor paint into the top of your bottle and rotate it as necessary to coat the entire inside of the bottle. Flip the bottle upside down & allow any excess paint to drain out.
I used my trusty Paint Pen to draw on the Frankenstein & Witch Faces, as well to create the Labels for the Witches Potion Station (which read: Potion, Brew, & a skull and cross bones).

What are some of your favourite ways to switch up old decor for the Holidays? 
Love to hear from you!!
& As always, Thank You for browsing & Remember to...
Dream Big      Sparkle More      Shine Bright

Sunday, October 19, 2014

Cheetah - (Must try Make-Up Looks to Try This Halloween).

For the entire month of October I will be sharing Halloween themed #MakeupMondays 
& this weeks look is Cheetah inspired.
I knew I wanted at least one animal inspired makeup tutorial and I am so glad to use a product line that isn't tested on one. In addition, you may be shocked to find out some of the animal by-products are used in cosmetic lines - including ALL higher end products sold in retail.
 All looks shared on my Blog are created using Arbonne's Cosmetics which are Vegan certified!! 
Cheetah Halloween Makeup
Modeled & Makeup By: Jennie Matthie

Products I Used: 

  • Arbonne CC Cream  
  • Concealer - Light
  • Bronzer
  • SheerGlow Highlighter
  • Bronze Highlighter
  • Runway Rouge Lipstick
  • Eye Shadow in shade Blackout
  • Black Liquid Eyeliner 
  • Sugar Plum Baked Eye Shadow Pallet 
  • It's A Long Story Mascara 

How To Get The Look!

Cheetah Halloween Makeup
Modeled & Makeup By: Jennie Matthie
Face:
Step 1. I began by applying Arbonne's new 10 IN 1 CC cream over my entire face! 
Step 2. I then applied concealer below my eyes in a V shape in shade slightly lighter than my natural colour to begin contouring. 
Step 3. Applied Bronzer to the C shape, along the sides of my nose, chin and outer forehead. 
Step 4. I then applied Sheer Glow Highlighter below the eyes where I highlighted using Concealer & Sheer Glow Bronzer where I applied my Bronzer to finish the contouring. 
Eye:
Step 5. Naturally fill in your Eyebrows - I like to use a shadow (Cabernet) as my brows are quite thick on their own & just need some light filling. 
Step: 6. I kept my eyes very neutral. I gently dabbed concealer over my entire lid just to give a nice even tone & cover any veins & smooth out any unsightly creases!  
Step 7. I then highlighted below the brow & tear duct using shade Icing from the Sugar Plum Pallet. 
Step 8. Applied Liquid eyeliner along the top lash line & dragging outwards (extending the lash-line) to create a dramatic wing! Feel free to go BIG with this, it is Halloween after all. 
Step 9. Apply It's a Long Story Mascara & False Eyelashes (optional) 
Cheetah Spots
Step 10. Using a small angled brush draw several small dot-ish(?) spots in a cluster(s) above your eye & anywhere else you'd like to have them using Black Out Eye Shadow ( the less perfect your dots the more natural and real an effect)
Step 11. Using your Liquid Eyeliner in Black outline the dots in a C-shape to add depth to your spots. 
Lip/Snout:
Step 10. Apply Runway Rouge Lipstick - I like to use a lip brush, I just find it allows for more control.
Step 11. Take your black liquid eyeliner again and line the your top lip. Extend this line upwards inside the split/ Cupids Bow of your lip, matching up with the tip of the nose. 
Add a few dots below the nose (as whisker holes) & you're OFF!
Cheetah Halloween Makeup
Modeled & Makeup By: Jennie Matthie
Dream Big     Sparkle More      Shine Bright