Search This Blog

Wednesday, November 9, 2016

'Love The Trees Until Their Leaves Fall Off, Then Encourage Them To Try Again Next Year' - Fall Photos with KM Photography

Cody and I both have a massive love for nature, & neither of us sit still for long, we walked and joked our way through the forest and Kristen did her thing we had her climbing trees & traveling far off he beaten path snapping pictures of us in our element!

We love the Wes Anderson quality, & the truly natural light beams shinning down onto us!
If you are looking for a photographer who will capture photos that are true to who you are and 100% natural be sure to check out KM Photography!

 These photos mean so much to me because they were taken By and With two of  my absolute favourite people! These two people inspire me and push me and motivate me daily & are more than likely to credit for my posts actually making it up! I have a massive amount of love for them both & am incredibly Grateful to have met such a true life long friend & love of my life at such a young age, & have the opportunity to love, grow, learn, adventure, & create together for as long as we have & will!
Gratitude Is The Best Attitude

Sunday, November 6, 2016

Arbonne Tahitian Coconut Lip Treatment Set

Refusing to let my lips dry out with the leaves is a breeze now! I am seriously in LOVE with this Lip Duo! I tried it for the first time when it was launched as part of last years Arbonne Holiday Line & have been obsessed with it ever since! It is back again as one of this years Limited Edition products. 

The cold, stale weather dries out more than just the leaves & this Lip Duo is my go to for making sure my lips aren't part of this process! 
 The Duo includes both the Tahitian  Coconut Lip Smoother & Tahitian Coconut Lip Salve.
The first step is the Lip Smoother ~ It is super gentle but extremely effective.

 I am not usually a fan of scrubs of any kind as I just find them far to abrasive for my skin. However, the grit of this one is very fine so you aren't scrubbing your lips off. This also allows it to remove even the smallest pieces of dry skin! Using your finger apply a small amount to your lips, gently exfoliating the skin as you're doing this (I have found the best results if I do this in small circles)
Using a cloth or towel you can gently wipe it right off, quick and easy!

BEFORE
Finish by applying the Lip Salve {aka heaven in a jar} It is so soft and soothing it leaves my lips feeling like flower petals! 
While I may not be one for scrubs, I am a fan of lip balms, chaps, glosses, sticks, whatever you got! I never used to get to the bottom of any self care products. However... that is a thing of the past since my introduction to Arbonne, and this Salve is no exception I'll be sure to scavenge every last drop thankfully it is probably the biggest lip Salve I've ever laid my eyes on. This helps with keeping track of it as well.. I mean I can't be the only girl who's constantly losing her lippy! 
AFTER

Gratitude Is The Best Attitude 

Friday, October 28, 2016

6 (MORE) Upcy Halloween Costume Ideas

Monday will be Halloween & in keeping with the up-cycled Costume theme,
 Last week I shared a post with 6 Up-cycled Halloween Costume Looks which you can see 
HERE.
 All are created using clothing you most likely already own or by getting a little nontraditional with your cosmetics!
All Cosmetic Looks were created using exclusively Arbonne Cosmetics.

Check out 6 MORE Below!


Bow down Witches ~ Not Your Boo

  1. Wednesday Adams - The Adams Family
    Photos By: KM Photography
    What You Will Need:
    ~ Black Lipstick / Eyeshadow (optional)
    ~ 2 Hair Elastics 
    ~ White Dress Shirt
    ~Black Long Sleeve Shirt
    ~ Black Shirt
    ~ Black Tights
    ~ Black Shoes 

    Makeup & Hair Look(s):
    Being that Wednesday was a child as far as makeup goes you really are being most true to character to wear none at all; But for the fun of it/ to give a bit of a darker vibe (this will also make your skin look more pale in comparison)
    The anchor of this look comes down to the Braids. Center part your hair & create Pigtail Style Braids.
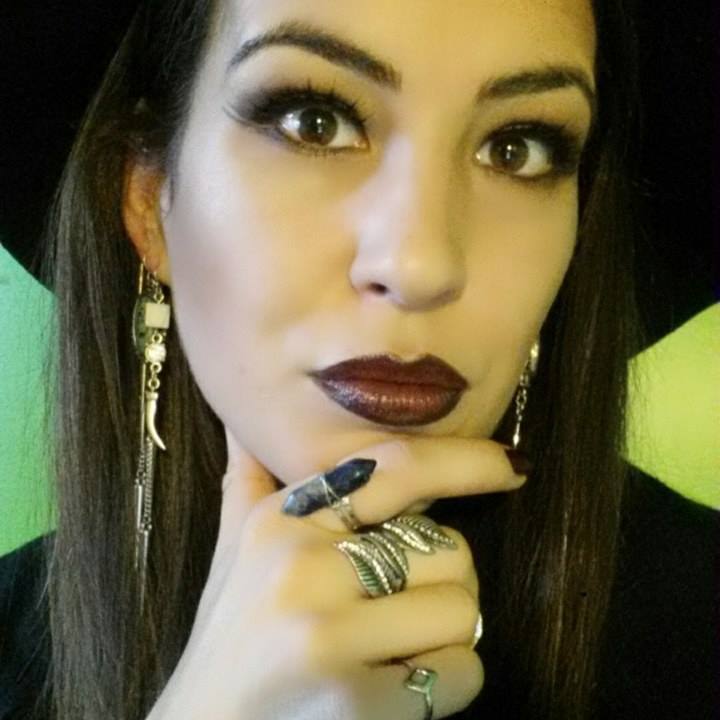
  2. Witch ~ American Horror Story Coven Inspired
    What You Will Need: 
    ~ Black Skirt & Shirt / Dress
    ~ DIY Moon Phase T-Shirt ~ Tutorial can be found HERE
    ~ Sheer Black Pantyhoes
    ~ Black Boots
    ~ Black Brimmed Hat
    ~ A Mix Of Jewelry (don't be scared to layer it up - Pun 100% Intended)
    ~ Black Liquid Eyeliner
    ~ Black Eyeliner (pencil)
    ~ Plum, Smoke, & Vanilla Eyeshadows
    ~ Mascara
    ~ Fake Eyelashes (optional)
    ~ Sheerglow Bronzer
    ~ Sheerglow Highlighter
    ~ Lipstick 'Sunset' (a deep red with pruple undertone)

    Makeup Look:
    Start by prepping your face & creating a base ~ moisturizer, primer, & Foundation. Controuing & Highlight!
    Using your plum eyeshadow and a large shadowbrush, cover the hood of your eye & continue up past the crease. If you have hooded eyes like I do you will want to make sure this extends past the crease even when your eyes are open which may mean takng it up to the base of your brow bone like I did. Using a slightly smaller brush add in the Smoke shadow into the crease to create more depth! Lastly use the Vanilla to highlight under the brow.
    I created a double winged liner for this look. This look is much easier than it looks & may sound to create.
    I will break the process down Step by Step. Start by lining your entire top lash line extending out into a wing. If you need help making sure they end up even / symmetrical place a small dot where you would ultimately like your wing to stop. draw a line connecting the dot to both the outer corner of the eye as well as in the middle of your upper lash line!
    Line the bottom lash line begining at the inner corner of your iris. Extend this line straght out in line with your upper wing (as closely as you can being careful not to merge the two lines)
    Using your plum eyeshadow and an angled brush carefully blur the lower liner and blend it out towards the inner corner of your eye!
    Finish with two Coats of mascara on both the top and bottom lashes & apply Fake lashes if you wish!
    Line your lips using your black liquid liner. Leave your mouth open until dry. Follow with Pencil Eyeliner extending the liner into the lip just slightly.
    Apply Lipstick & carefully rub your lips together until blended evently - you can also use your finger or a lipstick brush for this step if you prefer!
  3. 1950's House Wife
    Photos By: Chopfyt
    What You Will Need:
    ~Eyeliner 
    ~ Mascara 
    ~ Red Lipstick 
    ~ Bobby Pins 
    ~ Curlers / Curling Iron / Straightner 
    ~ Pearl Earrings / Necklace 
    ~Apron
    ~Oven Mitts 
    ~Medium ength - A line Dress.
    ~Kitten Heals

    If your apron is longer than your dress you will want to hem it to length. 
    I did this very easily by folding up the bottom of the apron and then adhering it in place with a Hot Glue Gun - this will allow you to remove / undo it post Halloween!

    Makeup & Hair Look(s):
    Once dressed, curl your hair using whatever technique you prefer! 
    You can add a Pin Curl by wrapping up a curl and pinning it in place with a bobby pin & securing with hairspray. 
    Makeup trends of the 1950's are where all the classic looks came from ~ Winged eyeliner & Red Lipstick.
  4. Black Cat
    Photos By: Chopfyt
    What You Will Need:
    ~Cat Ears
    ~Black & Nude Nail Polish
    ~All Black Clothing
    ~Black Eyeliner
    ~Mascara
    ~ Pink Lipstick
    ~ Black Pantsuit(the one I wore belonged to my Nana) / ALL Black Outfit
    ~Black Shoes

    Hair & Makeup Look(s):
    Start by prepping your face with a good moisturizer - this has been key for me to protect my skin from drying out while creating all of these looks; with using makeup in such obscure ways! Apply Primer to your entire face, followed by your Go To Tinted Moisturizer or Foundation. 
    With multi step looks like this I always like to start at the top of my face & work my way down to avoid dragging / resting my hand on the finished look. 
    About 99% Of this Black Cat Look was creating using Black Liquid Liner - so from here on out, until told otherwise that is what you will be using to complete ALL of the steps!
    I wanted to create a sort of Cheshire Cat Eyebrow vibe; To create a similar look simply Fill in & dramatize the Arch of your brows. Use The Images Above as a Reference. 
    The Cat Eye Eyeliner look can be explained best using a three step process. A Little long winded I know. First line both your Top & bottom lash lines - but do not connect the two just yet.  Then place a dot lining up with the corner of your eye & the bottom of your eyebrow (this would become the end of your wing). Draw a line connecting this dot first to the center of the top of your eye, as well as to the outside corner of your eye to finish the wing shape. 'colour' this in. Lastly Place a dot on your nose to extend the length of your eye that is in direct line with your tear duct.  Similarly to how you did with the first one, draw a line connecting it to both the center of your top lash line, as well as to the center of your bottom lash line & again 'colour' this in.
    Repeat This Process On The Other Eye.
    Continuing down the face the nose is up next! Create A soft 'M' or 'Top of a Heart' shape towards the tip of your nose, wrapping around the nostrils. 
    Draw A Straight line down from the inner corner of each nostril down to the top of the lip. 
    Gently 'dab' the end of your liner applicator above both sides of your lip to create Whisker holes. Using a quick wispy hand technique starting at the end of the Whisker holes and extending out towards the cheek.
    Line your upper lip & 'colour' it in entirely! Be sure not to close your mouth until dry!
    Using your Pink Lipstick now, applying only to your bottom lip. 
    Finish off with Two coats of Mascara! 

    The Cat Claw Manicure: 
    Paint Nails Black. Once dried, using your Beige Polish starting about mid way down the side of your nail paint a diagonal line towards the tip. Repeat this process on the other side & for all Nails. Add a top coat for a seamless finish.  Use The Image Above as a reference. 
  5.  Holly Golightly - Breakfast At Tiffany's
    Photo By: KM Photography
    Photos By: Chopfyt
    What You Will Need:
    ~Trench Coat
    ~Black Sunglasses
    ~Tiara / Sparkly Hair Clip
    ~ Hair Tie(s)
    ~ Pink Lipstick
    ~ Live Squirming Cat (optional) OR 
    Have a friend go as a Cat (See 4. for details)
    If You Do Not Have Bangs You can create Faux Ones Like I Did. 
    You Will Also Need:
    ~ Bobby Pins 

    Hair & Makeup Look(s):
    If you Have Bangs. Gather hair into a high Ballerina Bun, leaving your bangs down. 
    If You Do Not Have Bangs. Gather hair into a high ********Ponytail. Separate out a small section of hair from the top of it & bring it forward towards the face & secure in place with Bobby Pins.
    Add Your Tiara / Sparkly hair clip to finish off the Hair Look.
    Apply sunglasses & pink lipstick, grab your Cat Friend & you're set to go!
  6. Scare Crow
    Photos By: Chopfyt
    What You Will Need: 
    ~ Denim Overalls 
    ~ Fall Colour / Plaid Collared Shirt 
    ~ Straw /Brimmed Hat
    ~ Boots
    ~ Straw / Hay
    ~ Black Liquid Eyeliner 
    ~ Coral /Orange Lipstick. 
    ~ Mascara 

    Hair & Makeup Look(s):
    Bed Head... 
    I will admit I didn't bother to do my hair, credit to my bed.
    Following the 'Top to Bottom Of The Face Method' previously mentioned in the Black Cat Look... 
    Create a somewhat creepy stitched together face. Using your Liquid Eyeliner draw small dashes ( - ) down the center of your face. & Attempt to do a better job than I did at actually keeping it straight.
    Stopping at the nose. using the same dashes, draw a circle around the tip of your nose. 
    Continue with this process down the face Stopping again for the Lips. 
    Draw on additional dashes leading out from both corner of the mouth to about mid-cheek. 
    Lastly, go back & Continue the center line down the chin!
    Apply Coral Lipstick to both the lips & cheeks. The idea being that the face of an actual Scarecrow is traditionally sewn or painted on, which would limit the number of colours present!
    Apply Two Coats of Mascara to complete the look. 


    I hope that this has helped you pick out or helps to inspire your Up-cycled / DIY Halloween Costume Idea 
    I know had a blast creating them All!
    You can check out the Rest of the Halloween Costumes HERE & HERE

    Gratitude Is The Best Attitude