Search This Blog

Saturday, June 27, 2015

CANADA DAY Inspiration & DIY Beaded Fringe Crop Top

Canada Day is right around the corner & I have slowly started to prepare by digging out all of my red & white dishes, decorations, & of course clothing! 
I have shared a Tutorial on the DIY Canada Day Top, as well as my tablescape from Last Year's Canada Day Celebrations.
Check back in a few days to catch this years!
Downtown Ottawa Canada - Canada Day 2014.
DIY Beaded Fringe Crop Top (scroll down to bottom for DIY tutorial)
Custom silk & satin floral headpiece: By: Nixie Available for purchase through the Upcy Shop.
This was something I woke up and did frantically decided to do the morning of Canada Day. Hung a  Red & White Tassel Garland, & drew a quick mini art 'print' which you can't really see in this photo (which in the only one I snapped that day) it says "Keep Calm & Love Canada". I painted a pair of Red & White recycled glass bottles that I used to stick the Sparklers & Paper Straws into, added a lantern candle, a table runner & some coloured napkins all of which I already had laying around the apartment. As far as food / drink goes I kept it super simple, wine & some home made cookies in cute little Red & White paper cuplets!

DIY Beaded Fringe Crop Top

What You Will Need: 


~ A Tank Top / T-shirt 
~ Mixed beads
~ Scissors 

DIY Beaded Fringe Crop Top

DIY Beaded Fringe Crop Top
(I apologize for the complete lack of photos)
Step #1. Starting off with A Tank Top, OR by trimming the sleeves & neck off an old T-shirt.

Step #2. Using a sharp pair of scissors & beginning at one of the side seams start cutting strips from the bottom of your top, up (however high you wish your Crop to be) about an inch apart - the fabric will stretch and thin out, so be sure to not cut your strips to fine.
Continue this process around the entirety of your top.

Step #3. Once your slits have been cut you will want to go back through and individually trim the bottom seem line of the top off each fringe strip. (I know you are probably thinking that this would have made more since/ been easier to do prior to cutting the fringe but leaving it intact until after will give you a better shape to follow when cutting & prevents your top from twisting or rolling up/out of shape) As somewhat shown in the photos above.

Step #4. Pull gently on each strand & string on your beads! (The ones I used & pictured below are ones I have had since the 90's & were SO HARD to find for a period, but now you can pretty much find them at ANY Dollar or Craft store.) Just as a reference I added 4 per fringe but you can put as many as you'd like!
Keep Calm Love Canada 
Dream Big Sparkle More Shine Bright

Thursday, June 25, 2015

Beach Bag Essentials

Summer 2015 has started & the weather has been warming up steadily, Bring on the long summer days & nights at the beach!
 Ever since I was a child I have loved the water & when summer rolls around you would find me outside from sun up to sun down! Not much has changed since then, I still can think of no better way to spend the entirety of a day then outside; at the beach! 
Here you have what I consider to be my beach bag essentials!
  •    Beach Blanket - Similar HERE
  •    Water Bottle - Similar HERE
  •    Head Phones
  •    Bikini Cover Up - This is actually intended to be a scarf but I love it as a cover up!
  •    Bug Replant - I use Awaken Rejuvenating Body Mist - It is All Natural, Vegan, & contains very few ingredients but works as a natural bug repellent due to the Citrus!
  •    Sun Glass - Similar HERE
  •    A Good Book - Right now I am currently reading "Is Everyone Hanging Out Without Me & Other Concerns - By Mindy Kaling" - I got this book for Christmas & it is one of the books on my Summer Reading Goal list, & I am loving it so far - It's nice to know I am not the only one who stresses/thinks about some of the things she talks about.
  •    Bathing Suit - The pieces I happened to picture here are super random & honestly ancient, the Top I believe is from Walmart & Bottoms are Micheal Kors... Talk about Top & Bottom... 
  •    Hair Tie & a Head Band - Both from Ardene
  •    Lip Chap with SPF - Similar HERE
  •    Mini First Aid Kit
  •    Renewing Body Gelee - Some poor soul always forgets or decides to skip the Sunscreen and ends up with a nasty burn - this stuff provides instant pain relief and will also reduce the redness and limit the after peal!
  •    Sunscreen - I use Arbonne Liquid Sunshine Mineral Sunscreen
  •    Flip Flips - Also from Ardene... They have no shortage of fruit clothing & accessories!
    Now Get Packed & Get to The Beach!!
    Dream Big Sparkle More Shine Bright

Thursday, June 18, 2015

DIY 3D Geometric Gem

I made this 3D Geometric Gem wall hanging last week, & after a lot of re-working of my original plan & a Re-Do or two (My cat who decided to partake was more helpful with the 
de-constructing process); I am super happy with how it came out. 
There is so many fun & creative ways that you can style / display them from simply placing it on a table/shelf, creating a hanging display or mounting it onto the wall like mine (That will soon be a back drop) - I will be making many more! They are perfect for summer (which is just DAYS away) and if you used silver/blue(s) they would look like ice crystals!  I am always striving to create my DIY projects out of materials I already have around the house, & you more than likely will to! 
What You Need:
~ Paper Straws
*I recommend paper straws as they are much firmer/durable & will also take the paint much better than a plastic one would*
~ Wire
~ Hot Glue Gun & Glue Re-Fills
~ Paint 
Pliers / Wire cutter
~ Scissors 
Step #1. Before you do anything else, you are going to start by painting your 15 straws. You could also use a decorative washi tape to cover them, for a much faster process.

Step #2. Trim three of your staws down to 6" with your scissors ( the remaining 12 straws should be left full length). This step can be done before or after painting your straws.

After your straws have been painted, left to dry completely & cut down to size, you can begin creating your DIY Geometric Art. 

Step #3. Using your wire cutter, begin by cutting 8 lengths of flexable wire - roughly 4feet long (you want to be sure to have a fair amount of excess for maneuverability).
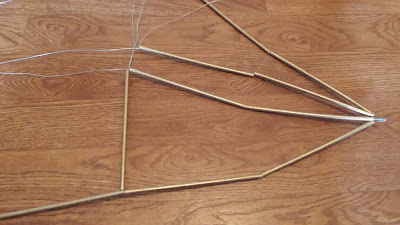
Step #4. Using pliers twist all of the wires together at one end - see image. 
Step #5. Separate the wires into 4 sets of two, & thread on two full length paper straws.
Step #6. To create the horizontal lines on your Gem fold / bend the wire as tight to the bottom of the last straw as you can creating a right angle inwards as shown in the image below. Repeat this process with ONE wire from the first three sections ONLY!
Step #7. Thread the Three smaller straws that you had previously cut down to 6" into the folded wires. As shown below.
Step #8. Begining with the first of your horizontal(s) secure it in place by folding the wire creating a right angle again, (always making sure to keep it as tight to the straw(s) as you can) this time so that it meets up with the section of wire(s) next to it. & weave both wires together (as you did with the first sets). Repeat this process for all four of your sections. & again see the images below for clarification. 
Once you have added all 15 Straws - your basic Flat 3D Geometric Gem Template is complete & should look very similar to this!
Step #9. Once your Entire template has been constructed you can begin folding the wire(s) into 3D shape, & securing the straws into place using your Hot Glue Gun.
I recommend starting where you began constructing and working your way up the Gem shape.

Step #10. Lastly, once your template has been folded into shape & the straws have been secured in place you can begin to gather all the wires; To create your final shape & secure it all into place simply twist the wires together just like you did in Step #4.
 If you decided to display yours on a table or shelf than you're done, otherwise you can play around with coloured or sheer string or flowers to create a hanging display, or mount it to the wall!
 
Dream Big Sparkle More Shine Bright

Thursday, June 11, 2015

10 Fashion Trends that have come back from the 90's

This week is all about 90's Nostalgia & it's return; easier this week I shared my Top  10 Hair & Makeup Trends that have com back from the 90's & today the theme continues as I delve into my Top 10 returning 90's Trends in Women's Fashion! 
  1. Floral Dresses:
    I don't think these timeless beauties ever left & I hope they never do! Though there has definitely been an increase in 90's inspired shapes/silhouettes such as this super simple 'Jumper' style worn by both ladies a decade & a half apart. Another classic 90's dress style that has returned is the slip dress, another simple timeless classic!
  2. Platform / Wedge Heels: 
    I can't be the only one who is guilty of owning multiple pairs of clunky platform sandals with that awful stretch band.. Thankfully when Wedge heels returned they took a different much more modern shape & design(s)! I Personally prefer wedge heels as I find they are much easier to walk in - even the more unique designs with cut out features are a lot easier than they look to walk in -(allowing me to stack on a few extra inches of height without walking like a calf)!
  3. High waisted / Over-sized / torn Jeans:
     
    When it comes to denim right now just about anything goes which is awesome, because it really is kinda like a bathing suit in a sense that finding the right fit will change your life!!! Can I just say that I love that wide leg denim is slowly returning though I'm sure not everyone is with me on that one! High waisted denim has been the staple for a few years now & doesn't seem to be going anywhere (which is great for anyone like me who has short legs & more than enough torso to go around)! I Shared around tutorial last fall showing how you can DIY your own Boyfriend Jeans, which can very easily be altered into DIY shorts - if you're interested you can find the link HERE.
  4. Denim Jackets: 
    Maybe it's just the country in me coming out but I just love a good Jean Jacket! & YES you can wear them together ...it's become crystal clear Justin & Brittany were ahead of their time!
  5. Crop Tops / Front Tie Shirts / Matching Separates:
    Crop Tops / Matching Seperates: Crop Tops & Tie Front tops are back!!
    I Kind of lumped these all in together because I felt they just worked kind of went hand in hand! I think that Front Tied tops might just be one of my favourites for summer, & has a certain 'girl next door' (the movie) vibe to it!
    I think crop tops get something of a bad rep, yes like everything else there are absolutely ways that it can be worn that would look less than classay' & yet in the same light there are few things quite as chic as a set of matching Separates!
  6.  Overalls: 
    Jennifer Aniston seriously can do no wrong, & you best believe I'd take fashion advice from her in overalls! She rocked her last 'THEN' look in my previous post of returning 90's cosmetic look too! She truly has her own unique style which which i think shes proven can truly stand the test of time! There is so many different styles of overalls now, but some of the most popular that I've seen are; The Full length jean overalls warn tight & sleek or lose& tattered but always cuffed, Shorty-Overalls, as well as Trouser (dress pant) which can be dressed up super easily with a pair of heals & some statement jewelry!
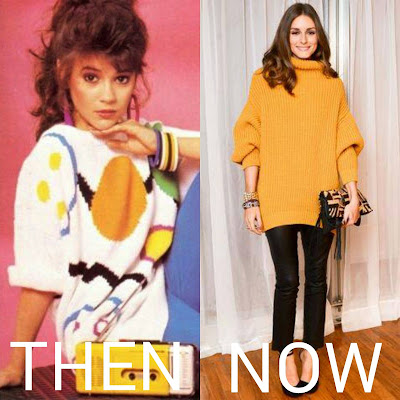
  7. Slouchy / Over-sized knitted sweaters:
    I think this goes with the Floral Dresses - When was/will knitts NOT be around?! I love anything knit (especially by hand) & the bigger the better! I also like them all year long, chunky cable knitts, & turtle necks for the winter months & light, sheer pastel colours for summer!
  8.  Dock Martens:
    Because returning fashions from the 90's would not be complete without them!
  9. Choker Necklaces:
    'Tattoo chockers necjlaces' are those classic 90's black spiral chocker necklaces that you could get for about $0.25 at just about any dollar store, the same one that you'll now find on the neck of Kylee jenner, & many other young celebrities who if I'm being honest - are they even old enough to remember the 90's?! - Try not to get stuck on those, there are so many great ones out there & i think they may just be the next big trend in statement jewelry!
  10. Face/ Body Jewels & Temporary Tattoo's:
    The 90's were all about covering yourself in temporary tattoos if you were a kid; & having rhinestones on your face was just about as cool as you could get! Fast forward 15 years, The tattoos are metallic instead of colour, us 90's kids are getting to relive it all!!

Never To Return 

  1. [Those pants that ZIP-Off & become shorts]:
    OR Pants, Capri Pants, & Shorts... & Never with a shortage of pockets!
    Now... These pants are suited perfectly for camping or a week out in nature & would certainly help to reduce on packing! but let's leave it at that ... okay!?
  2. Juicy Coutoure Valour Tracksuits:
     
    I heard a nasty rumor that these things are coming back & I for one just refuse to believe that could ever be the case!
    [Shout-Out to all my fellow short girls who would wind up dragging around half the school yard / hallways with the draping excess of pant... or was that something I once shared exclusively with Brittany?]
    Thank you so much for browsing & ALWAYS 
    Dream Big Sparkle More Shine Bright

Monday, June 8, 2015

10 Hair & Makeup Trends that have com back from the 90's

15 years have come and past since the Hay-Day that was the 90's & that seemed to have been just enough time to cause a flood of nostalgia resulting in a HUGE wave of returning 90's trends!
This week on the Blog I am going to share my favourite 90's trends in Makeup, Hair & Fashion, as well as some that I hope Never Return. First up I will be sharing 
my Top Picks on returning Cosmetic & Hair styles, tips on how you can achieve them!
  1. Deep Berry & Dark Matte Lips: 
    This look was gorgeous then & is gorgeous now!
    To me there is nothing quite like a deep berry red lip!
  2. Lip Liner: 
    Lip Liner can be a great cosmetic tool to create a nice clean line, seal in lipstick, enhance lips for a fuller look, & take a neutral lip up a notch... when used properly that is, just try to avoid replicating Pamela Andersons' look! 
  3. Iridescent Makeup:
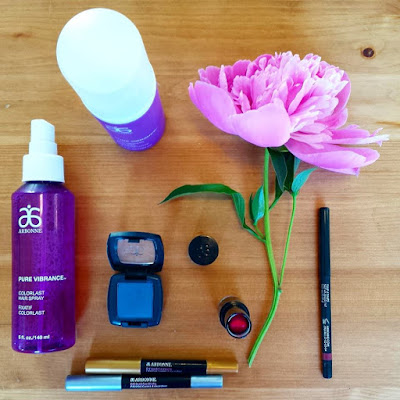
    This is a technique can be achieved very easily with the Arbonne Sheer Glow Highlighter, & can be applied to absolultely any part of the face for a beautiful result! Some of my favourite places to apply it is anywhere I would typically highlight (under the eyes the bridge of the nose etc) the inner corner of the eye, below the brow bone, on your lips to create an ombre effect/ on the cupids bow to enhance size & shape!  
  4.  Blue-eye shadow:
    Less is MORE when it comes to pulling off blue eye-shadows, try lining your upper lash line with Blue Slate, or gently sweeping it along the outer portion & crease of your lid & then sweeping Plum along the center of your eye & lower lash line as shown above for a cool smokey effect!
  5. Natural Bold brows:
    I love love love the fact that overly maintained brows are over & natural/fuller eye brows are finally getting their chance to shine! 
  6.  Messy  / Tossled hair or BEACH waves & big blow outs:
    I am all about hair volume.. the more the merrier, I personally LOVE the 'THEN' look I selected for this! It's all about bigger is better in my book when it comes to hair, but right now it is all about a more relaxed tossled beach wave look. To create this look, apply a good quality Texturing Mousse that will add control but is also flexible! 
  7.  The Center Part:
    Because having the same haircut as your childhood crush cant be bad?! I love that it's all about the center part right now, mostly because I have spent the majority of my life fighting a natural center part that I have now set free!
  8.  Accent Braids: 
    Braids are everywhere right now, they can be worn relaxed & loose, or tight & chic, & are a fun & easy way to take your hairstyle up a notch! More on This To Come; try to be patient with me though, as I have something completely NEW in mind!
  9.  Flower Crowns:
    These are back with a vengeance it seems & popping up everywhere from Festivals to Weddings in just about every shape, colour & size imaginable! Even princesses are wearing them. My love for them is no secret! If you'd like you can check out some my own Upcy Flower Crown designs HERE.
  10. Scrunchies:
    Now I am well aware that many of you may feel as though these belong in the below category of  'Never To Return' but I have absolutely NO shame in my Scrunchie game; Besides the fact that I really do think they look cute, they are SUPER functional (where all my curly headed girls at?!) they just don't get tangled dent or frey your hair the way a typical hair elastic(s) do.
Never To Return
  1.  Two shades too light 'Cover-Up':
     This is so hard to talk about without sounding a little blunt here, & maybe we all won't blog about it admit it... but I think we all know what I am referring to here, for some reason the makeup of the time in the 90's was, ghostly, No contouring, No highlighting, No freckles, but occasional obnoxiously overly bright blush. The look could be closely compared to the makeup worn during the Elizabethan era. There is nothing quite like the look of when ones face(make-up) does not match the colour of ones body. - think Goldie Locks and the Three Bears - Not to dark, Not to light, Just Right!  I think the fact it was most often referred to as 'Cover-Up' in the 90's speaks for it's self, that really did seem to be the goal.. Thankfully Foundations have come a LONG way in the past 15years! 
  2. Butterfly Clips:
    I am probably guiltier than most 90's girls for over use of these nasty things... It was a moment of Freedom for me when I started styling my own hair (keep in mind that my Mom is VERY talented in this area, she would do French braids of any kind & top them all with the cutest bows, But I did not appreciate this then.. & for some reason felt as though sticking on every last one of these I could get my hands on was the best way to express myself... though Hilary Duff  Lizzy Mcguire can seriously pull of anything, including plastic hair accessories!
    Thank you for browsing; Next up I will be sharing my favourite returning 90's fashion trends, including metallic temporary tattoos!!
Dream Big Sparkle More Shine Bright